Webinars are becoming more and more popular since the pandemic started because they are a convenient substitute for the usual offline seminar.
However, one crucial question that often arises is, “How do you charge for webinars?”
No matter, if you are a professional offering paid sessions, or a teacher tutoring students, deciding on the right pricing strategy can be challenging.
In this blog post, we will explore various approaches to charging for webinars, factors to consider when setting prices, and tips for maximizing revenue.
Let’s dive in.
How does a webinar work?
Webinars are usually presented in front of a larger audience, meaning that only the hosts can turn their cameras on and unmute themselves. However, this could be managed through the settings and participants can also be allowed to speak. Lately, in virtual events lingo, they refer to this as ‘inviting someone to the stage’.
In case the host decides not to grant that permission, attendees can freely use the chat to ask questions, make comments, or give feedback, which makes the whole experience a bit more interactive.
The host needs to be able to share their screen and provide participants with easy access to all referred materials during the webinar.
Also, in terms of paid webinars, sending invoices to each participant can be a bummer so what you should be looking for is a platform that combines video meetings with payments.
How to host paid webinars? Start by registering with us
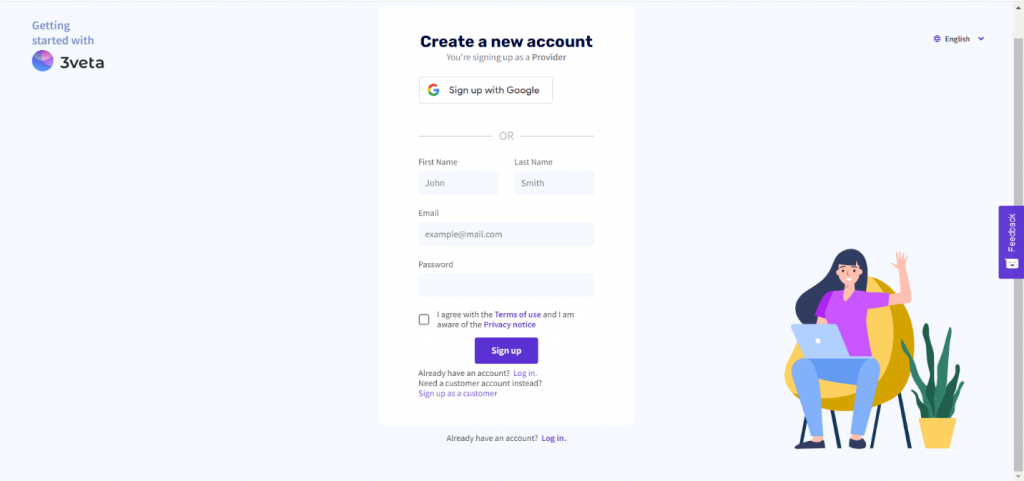
The registration process at 3veta is quite simple and it takes minutes to set up your account.

As you can see, you can use your Google account to fill in the information and register as a service provider.
Apart from typing down the regular stuff – name, email, password, and so on, you’ll have to input your company’s name as well so that your clients can see it in your URL.
Once you’ve verified your email, you’re ready to go and start using our services for free.
You can create your own webinar now.
How to set up paid webinars with 3veta?
Now that you have a provider’s account with us, go to Meetings.

In this section, you can see all your upcoming or past events and manage them. For now, it’s empty but let’s change that.
Click on Create a meeting to schedule your first webinar and manage the settings.
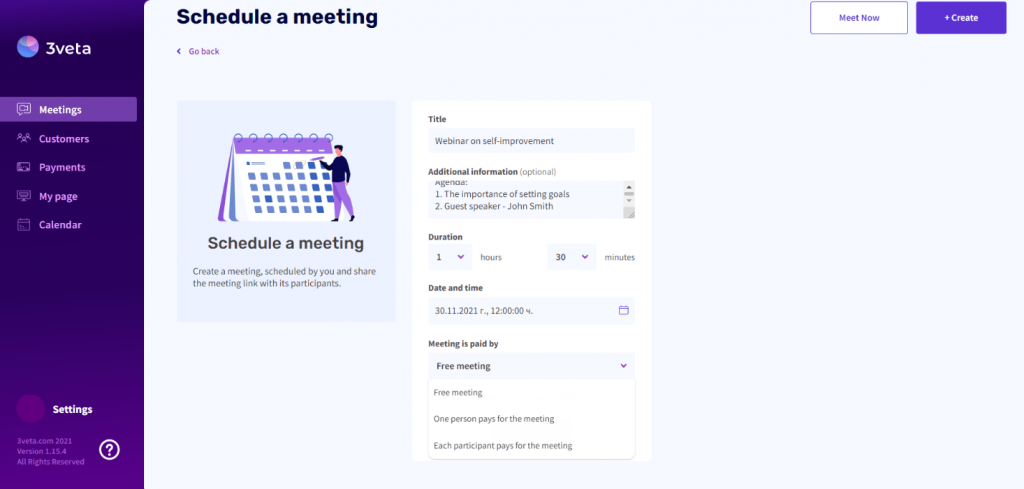
Here is an example of what comes next:

Type down your preferred title and add some notes or any additional information that you’d like to share with the attendees. This would be the perfect place for your webinar agenda.
Determine the duration, date, and time and after that, we get to the more interesting part.
If your webinar is planned to be for free then choose the Free meeting option and you’ll be done.
How to charge for webinars?
However, if you want to get paid, you’ll have to select between two options.
If a corporation or institution is paying for your services, choose One person pays for the meeting. This way the employer will be the person who pays you, while employees will be the attendees joining your session.
If you want each attendee to pay on their own, then click on the Each participant pays for the meeting button. This way every person who wants to join your webinar will be charged beforehand.
After you’ve made that choice, you’ll be able to set a price accordingly.

You can also change the currency.
3veta is a premium video conferencing software that allows meetings with up to 100 people. These are perfect for workshops as well as webinars, too. Moreover, you can also stream your webinar on both Facebook and Google.
How do you get paid for your webinars?
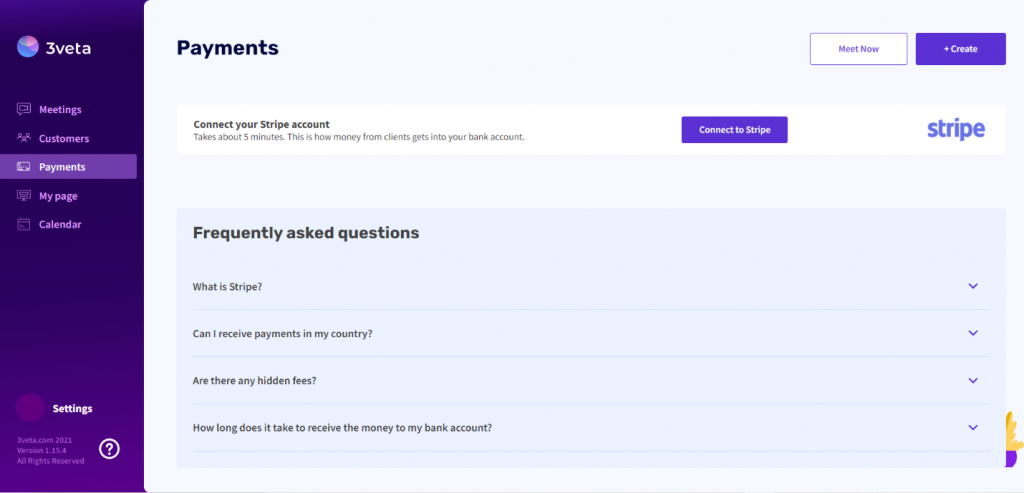
3veta works with Stripe to provide you with a secure and subtle method of online payments in exchange for a small commission fee. Before joining your webinar, each participant will be asked to pay the amount of money you’ve determined.
Stripe will process and collect your money and will send them to your bank account right away.
If you already have a Stripe account you’re a champ!
Go to Payments and select Connect to Stripe, in a matter of a couple of clicks you’ll be ready to receive payments as a service provider at 3veta.

And if you don’t have a Stripe account yet, no worries! The registration process is really simple and should take you less than 5 minutes.
Some additional features that you might find useful for webinars
We covered how to create and charge for a webinar but what about attracting an audience?
3veta allows you to create your personal booking page where people will be able to see your availability and even book a meeting with you.
Apart from that, we offer a website builder that is extremely user-friendly and doesn’t require you to have any sort of technical background.
You’ll be able to share more information about your services on that website and post all upcoming events. This will allow you to reach more people and increase the number of attendees!
And last but not least, 3veta integrates with other platforms and displays all of your upcoming meetings, webinars, and other activities in one calendar that’s only for you to see and manage.
Got any other questions?
And in case you need further assistance or something is left unclear, don’t hesitate to contact us! We’ll be happy to help.
Whether you decide to use 3veta or another popular webinar software, make sure you test it carefully and see if it meets your business needs.


